
How Blockchain Works; Demonstrated In GO.
It's the trust issues for me... 😕


Table of contents
Introduction
Blockchain is a groundbreaking technology that has evolved beyond its initial use in cryptocurrencies and has become a vital component of secure, decentralized systems. In this article, we will explore the fundamentals of blockchain and provide a hands-on demonstration of its inner workings using the Go programming language.
Why Blockchain Matters for Developers
As developers in these times, understanding blockchain is no longer optional—it's a strategic advantage. Beyond its association with digital currencies, a blockchain is a powerful tool for establishing trust, transparency, and security in various applications. Whether you're a seasoned developer or a curious newcomer, grasping the fundamentals of blockchain opens doors to innovative solutions and new opportunities.
The Core of Blockchain Technology
At the core, blockchain is a distributed ledger that records transactions across a network of computers. Its decentralised nature sets it apart, eliminating the need for a central authority. Picture a chain of blocks, each containing a list of transactions, linked together through cryptographic hashes. This ensures data integrity and makes it virtually tamper-proof.

What Makes Up a Blockchain
Understanding the key components is crucial:
Blocks: The basic units of data storage, containing a list of transactions.
Transactions: Information about events or actions, such as the transfer of assets.
Cryptographic Hashing: A secure way to create a unique identifier for each block, ensuring the integrity of the data.
Decentralization: The absence of a central governing body, enhancing security and fostering participant trust.
The Role of Consensus Algorithms
Consensus algorithms, such as Proof of Work or Proof of Stake, play a vital role in maintaining the integrity of the distributed ledger. These mechanisms ensure that all nodes in the network agree on the state of the blockchain, mitigating the risk of fraud or manipulation.
What to Expect in this Article
The following sections will explore implementing a blockchain system using the Go programming language. Go's simplicity and efficiency make it an excellent choice for understanding the intricacies of blockchain without unnecessary complexity. We'll walk through the code structure, discuss key functions, and provide a step-by-step demonstration of the blockchain.
That said, let's get into it! 🔥
First, you want to set your environment up, you should have GO installed on your computer, so you can create a directory for your project by running:
mkdir go-blockchain
This will create a folder for the project. Next, we go into that folder;
cd go-blockchain
and initiate a new GO project within the package by running:
go mod init github.com/{your-username}/go-blockchain
The above command will create a file called go.mod within your project directory.
Once that is done, create a main.go file within the project directory. We'll be doing all our cooking in this file. 👨🏻🍳
What we will be creating
We will be creating a simple yet powerful blockchain system. This blockchain will serve as a robust ledger for tracking book checkout transactions, showcasing how a decentralized and tamper-resistant system operates. Our creation will encompass the following key elements:
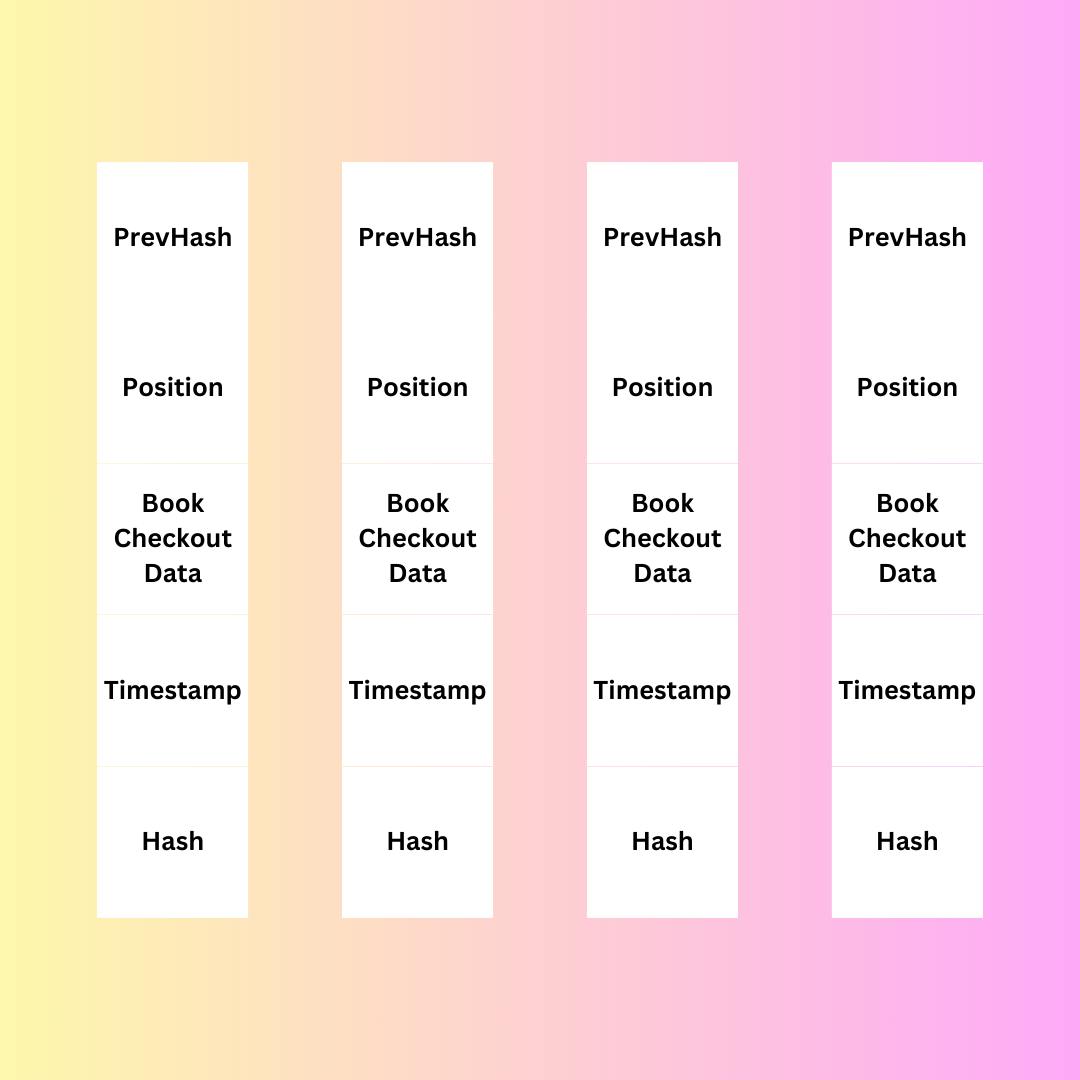
Blockchain Structure: - We'll define a structured blockchain, consisting of individual blocks, each containing essential information about a book checkout. These blocks will be linked together, forming an immutable chain of transactions.
Block Components: - Each block in the blockchain will encapsulate checkout data, position, timestamp, hash, and the hash of the previous block. This structure ensures data integrity, traceability, and security as seen in the illustration below:
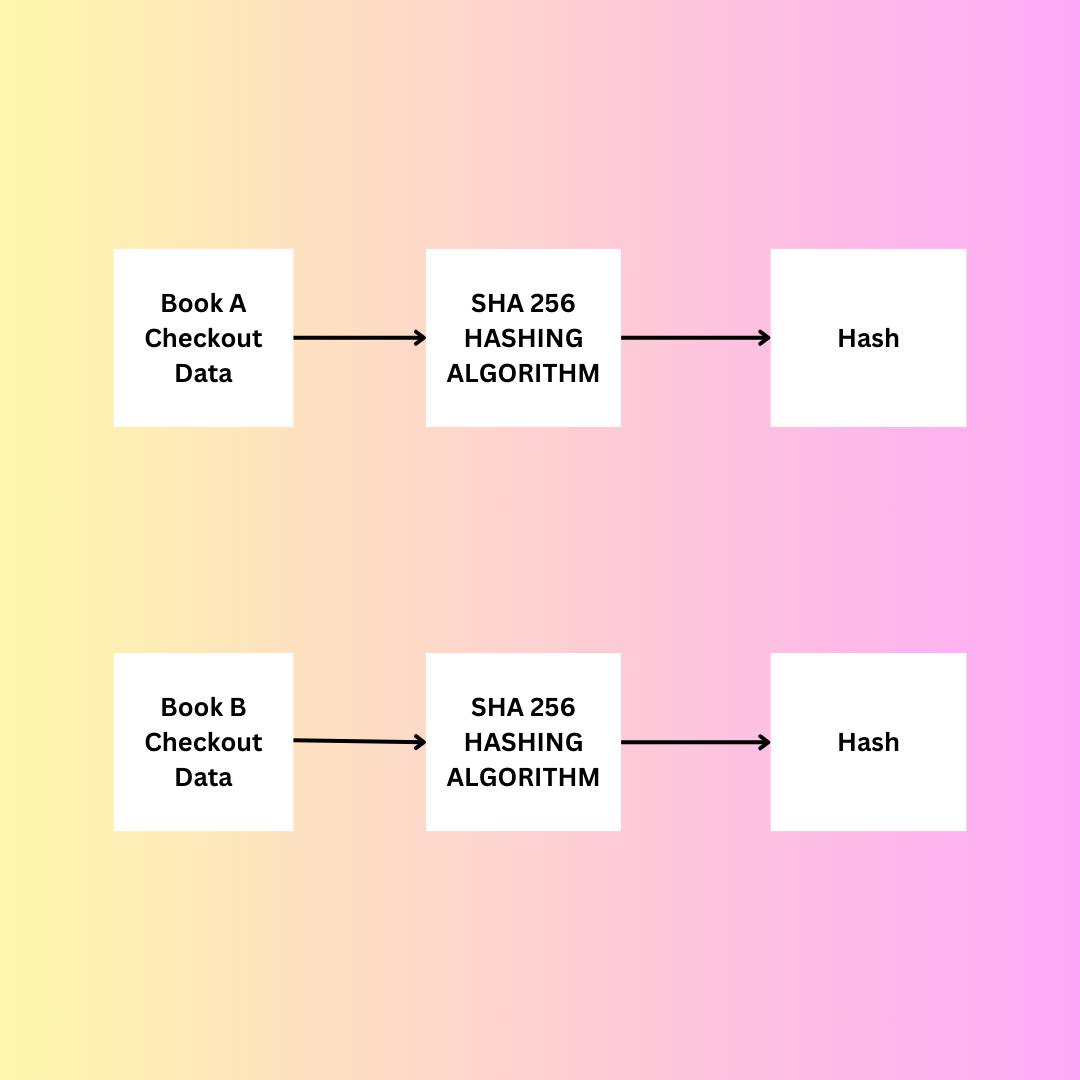
Hashing Mechanism: - The blockchain will utilize cryptographic hashing, particularly the SHA-256, to generate unique identifiers for each block. This hashing mechanism guarantees the immutability of past transactions and safeguards the entire blockchain from unauthorized alterations.
Genesis Block: - We will establish the concept of a genesis block, marking the inception of our blockchain. This initial block serves as the foundation for subsequent transactions and forms the basis of the entire ledger.
HTTP Handlers: - To interact with our blockchain, we'll implement HTTP handlers for essential actions, such as creating new books, retrieving the entire blockchain, and adding new blocks to the chain. This practical approach allows us to witness the blockchain through HTTP requests.
Real-time Display: - As a bonus, we'll incorporate a real-time display of existing blocks in the blockchain, showcasing the information stored within each block, including the previous hash, data details, and the block's unique hash.
Let's see how all of these come together in code. We will start with setting up our blocks and blockchain structures. Open the main.go file and create the following structs:
// Book represents the item to be checked out
type Book struct {
    ID          string `json:"id"`
    Title       string `json:"title"`
    Author      string `json:"author"`
    PublishDate string `json:"publish_date"`
    ISBN        string `json:"isbn"`
}

// BookCheckout represents the data of a Book to be checked out
type BookCheckout struct {
    BookID       string `json:"book_id"`
    User         string `json:"user"`
    CheckoutDate string `json:"checkout_date"`
    IsGenesis    bool   `json:"is_genesis"`
}

// Block represents the individual block on the blockchain
// it holds the checkout data, position, timestamp, hash, and prevhash
type Block struct {
    Pos       int
    Data      BookCheckout
    TimeStamp string
    Hash      string
    PrevHash  string
}


// BlockChain represents the core blockchain implementation
type BlockChain struct {
    blocks []*Block
}
Book is a struct representing the item to be checked out.
It contains fields such as ID, Title, Author, PublishDate, and ISBN, each providing information about a specific book.
The json:"..." tags indicate the JSON field names for proper serialization/deserialization.
BookCheckout is a struct representing the data of a book to be checked out.
It includes fields such as BookID (the ID of the book), User (the person checking out the book), CheckoutDate (the date of checkout), and IsGenesis (a flag indicating if it's the genesis block).
Block is a struct that represents a single block in the blockchain. As seen in the illustration above, it holds the position, the underlying data of transactions (in this case, we are using the BookCheckout Information), the timestamp of the block creation, the unique hash of the new block, which is also based on the hash of the previous Block
BlockChain is a struct representing the core implementation of a blockchain. It consists of a slice of Block pointers (blocks), forming the entire chain.
Great, now we have our structs! Let's move on to adding the relevant functions, we will start with the creation of new books since this is the item that we will be purchasing.
But before that, we need to set up our HTTP handlers as we will send the request for creating the books via HTTP. You can use any HTTP tool of your choice. For me, I'd be using an amazing, easy-to-use HTTP package in GO called BARF.
To install BARF, navigate to your project root directory, and run the following command:
go get github.com/opensaucerer/barf
This will install the barf package into your project, and you can now create a simple HTTP server in the main function of the file like so:
func main() {
    // start barf server
    if err := barf.Beck(); err != nil {
        barf.Logger().Error(err.Error())
    }
}
Now if you go to your terminal again and run go run main.go, you should see some logs like this:

Now that our server is running, we can write the function to create a new book function as a handler and hook it up to a route within our server.
func newBook(w http.ResponseWriter, r *http.Request) {
    var book Book
    err := barf.Request(r).Body().Format(&book)

    if err != nil {
        barf.Logger().Error(err.Error())
        barf.Response(w).Status(http.StatusInternalServerError).JSON(barf.Res{
            Status:  false,
            Data:    nil,
            Message: "Error creating book",
        })
    }

    h := md5.New()

    io.WriteString(h, book.ISBN+book.PublishDate)
    book.ID = hex.EncodeToString(h.Sum(nil))
    barf.Response(w).Status(http.StatusOK).JSON(barf.Res{
        Status:  true,
        Data:    book,
        Message: "New Book Created",
    })

}
The newBook function processes the order or item to be traded on our blockchain simulation. It collects the information of the book to be purchased over the network and parses the incoming data into the Book struct.
barf already helps with the conversion with this line: err := barf.Request(r).Body().Format(&book) .
If there's an error in parsing the JSON, we return an error response to the user.barf also quickly helps with that (see how quick and easy-to-use barf is? 👀)
Else, If everything goes well, we then use the md5 hashing algorithm to generate a hash of the combination of the book's ISBN and publish date to generate book.ID.
Then, we simply return the parse of the created book to JSON and return the result as the response to the request. No need to mention thatbarf takes care of that gracefully as well.
Hooking it up to a route, specify the preferred route with barf before starting the server:
func main() {
    barf.Post("/new", newBook)
    // start barf server
    if err := barf.Beck(); err != nil {
        barf.Logger().Error(err.Error())
    }
}
Once that is done, we can move on to creating another function that writes the block to the blockchain.
To fulfil this procedure, we are going to create two more HTTP handlers and some helper functions.
Considering how the blockchain works, we would need to create individual blocks that will hold the sensitive information within the system. In this system, the sensitive data is the book checkout information.
So, let's write the function to create a new block:
func CreateBlock(prevBlock *Block, data BookCheckout) *Block {
    // function to create a new block
    block := &Block{}

    if data.IsGenesis {
        block.Pos = 0
    } else {
        block.Pos = prevBlock.Pos + 1
    }
    block.TimeStamp = time.Now().String()
    block.Data = data
    block.PrevHash = prevBlock.Hash
    block.generateHash()

    return block
}
This CreateBlock function takes in the previous block information and the new data for which we intend to make a new block. Remember that, in our breakdown of the blockchain project, we highlighted that we will consider the creation of the Genesis Block.
The condition in the function checks if the checkout data is the genesis. If so, it assigns the initial position of 0, else, it simply increases the position count.
Timestamp is very important in the creation of blocks as per the rules of blockchain technology. We must know the very time that each block was created.
Every block also holds the value of the previous hash, the point at which the "chain" is created and the inclusion of the previous hash (or parent hash) also enforces integrity on the blockchain.
Each block points to the hash of the block before it, forming a sequence of interconnected blocks. It creates a dependency between blocks such that altering the data in one block would require changing the hash, affecting the subsequent blocks.
This interdependence makes it computationally infeasible to tamper with a single block without altering all subsequent blocks, providing a mechanism for maintaining the integrity of the entire blockchain. Isn't that beautiful?
Okay, the next line right after that is the generation of the newly created block's hash.generateHash() is a method for the block struct, let's declare the method right under the Block struct:
type Block struct {
    Pos       int
    Data      BookCheckout
    TimeStamp string
    Hash      string
    PrevHash  string
}

func (b *Block) generateHash() {
    // method to generate block hash based on the checkout data sttacched to the block
    bytes, _ := json.Marshal(b.Data)
    data := string(rune(b.Pos)) + b.TimeStamp + string(bytes) + b.PrevHash

    hash := sha256.New()
    b.Hash = hex.EncodeToString(hash.Sum([]byte(data)))
}
The generateHash() method takes the associated block and generates its hash.
It converts the entire block checkout data into bytes and concatenates its string equivalent with the position, timestamp and the previous hash to generate the input for the hashing algorithm.
In a blockchain, the standard hashing algorithm is SHA256. That is why we have the line: hash := sha256.New() to initiate the sha256 algorithm, and finally compute the hash of the data, convert the result into a string, and assign it to b.Hash.
In this process of creating a new Block, much of the hashing processes were dependent on the checkout data. So, let's see how we create the checkout data.
For this, we will need our second HTTP handler to collect the checkout data:
func writeBlock(w http.ResponseWriter, r *http.Request) {
    var bookCheckout BookCheckout
    err := barf.Request(r).Body().Format(&bookCheckout)

    if err != nil {
        barf.Logger().Error(err.Error())
        barf.Response(w).Status(http.StatusInternalServerError).JSON(barf.Res{
            Status:  false,
            Data:    nil,
            Message: "Error creating book checkout",
        })
    }
    resp, err := json.MarshalIndent(bookCheckout, "", " ")
    if err != nil {
        barf.Logger().Error(err.Error())
        barf.Response(w).Status(http.StatusInternalServerError).JSON(barf.Res{
            Status:  false,
            Data:    nil,
            Message: "Error creating book checkout",
        })
    }

    barf.Response(w).Status(http.StatusOK).JSON(barf.Res{
        Status:  true,
        Data:    string(resp),
        Message: "New Block Created",
    })

}
This function is quite straightforward, we are simply collecting the book checkout information, parsing it into a struct and then returning the result as a response to the request.
Add it to a route like so:
func main() {
    barf.Post("/", writeBlock)
    barf.Post("/new", newBook)


    // start barf server
    if err := barf.Beck(); err != nil {
        barf.Logger().Error(err.Error())
    }

}
HOLD UP! The function is named writeBlock() but we don't see any blocks being created or written here. This is intentional.
We have written the function that collects the data to be stored in a single block, however, writing a block to a blockchain is incomplete until we validate the block and add it to the list of blocks we have in the blockchain.
Since we have a BlockChain struct with an array of blocks, let's implement the function to add a new block to the chain as a method on the BlockChain struct:
type BlockChain struct {
    blocks []*Block
}

func (bc *BlockChain) AddBlock(data BookCheckout) {
    // method to add a block to the array of block chains
    lastBlock := bc.blocks[len(bc.blocks)-1]

    block := CreateBlock(lastBlock, data)

    if validBlock(block, lastBlock) {
        bc.blocks = append(bc.blocks, block)
    }
}
The AddBlock() method uses the CreateBlock function to generate a new block (block) based on the provided data (a BookCheckout instance) and the information from the last block.
Then, it uses the validBlock function to check whether the new block is valid concerning the previous block (lastBlock). We'll write that in a moment.
Finally, bc.blocks = append(bc.blocks, block) If the new block is valid, append it to the array of blocks in the blockchain (bc.blocks).
How do we know if a block is valid? This validation typically includes checking if the hashes match and if the position is correctly incremented:
func validBlock(block, prevBlock *Block) bool {
    if prevBlock.Hash != block.PrevHash {
        return false
    }
    if !block.validateHash(block.Hash) {
        return false
    }
    if prevBlock.Pos+1 != block.Pos {
        return false
    }
    return true
}
As seen in the snippet above, we need another method on the block struct to validate the generated Hash:
func (b *Block) validateHash(hash string) bool {
    b.generateHash()
    return b.Hash == hash
}
This method re-computes the hash of the given block again and compares it to the provided has and returns the equality as its result. Simple and Sleek! 👌
Great! We can now create, validate, and add new blocks to our blockchain. However, notice that we have not yet called the AddBlock function anywhere yet. We need to carefully consider how we intend to manage the state of our blockchain array.
When would we initiate a new BlockChain? And where would it be updated?
The new BlockChain should be initiated before the main function for two reasons. First, we will need the base BlockChain "object" somewhere in the file to make it globally available to every block/function.
Ad We also need to ensure that this blockchain is not being re-instantiated every time we start another request to the server. We want just one chain per server instance!
So, let's put it right below the struct definition like so:
type BlockChain struct {
    blocks []*Block
}

func (bc *BlockChain) AddBlock(data BookCheckout) {
    // method to add a block to the array of block chains
    lastBlock := bc.blocks[len(bc.blocks)-1]

    block := CreateBlock(lastBlock, data)

    if validBlock(block, lastBlock) {
        bc.blocks = append(bc.blocks, block)
    }
}

var MyBlockChain *BlockChain
Okay! Now we can call the AddBLock method on this BlockChain that we have initialized. We will call the AddBlock method within the writeBlock handler, right after we successfully parse the checkout data, we can update our writeBlock function to this:
func writeBlock(w http.ResponseWriter, r *http.Request) {
    var bookCheckout BookCheckout
    err := barf.Request(r).Body().Format(&bookCheckout)

    if err != nil {
        barf.Logger().Error(err.Error())
        barf.Response(w).Status(http.StatusInternalServerError).JSON(barf.Res{
            Status:  false,
            Data:    nil,
            Message: "Error creating book checkout",
        })
    }
    // Add block here
    MyBlockChain.AddBlock(bookCheckout)
    resp, err := json.MarshalIndent(bookCheckout, "", " ")
    if err != nil {
        barf.Logger().Error(err.Error())
        barf.Response(w).Status(http.StatusInternalServerError).JSON(barf.Res{
            Status:  false,
            Data:    nil,
            Message: "Error creating book checkout",
        })
    }

    barf.Response(w).Status(http.StatusOK).JSON(barf.Res{
        Status:  true,
        Data:    string(resp),
        Message: "New Block Created",
    })

}
Now, we have completed the process of initiating a transaction, creating the block, validating the block, and finally adding that block to the chain.
To verify that our results are accurate and valid, we should write the last HTTP handler that traverses the blocks within the blockchain and returns their content as a JSON response:
func getBlockChain(w http.ResponseWriter, r *http.Request) {
    jbytes, err := json.MarshalIndent(MyBlockChain.blocks, "", " ")
    if err != nil {
        barf.Logger().Error(err.Error())
        barf.Response(w).Status(http.StatusInternalServerError).JSON(barf.Res{
            Status:  false,
            Data:    nil,
            Message: "Error getting blocks from chain",
        })
        return
    }

    barf.Response(w).Status(http.StatusOK).JSON(barf.Res{
        Status:  true,
        Data:    string(jbytes),
        Message: "Error getting blocks from chain",
    })

}
And hook it up to the routes in the main() function:
func main() {
    barf.Get("/", getBlockChain)
    barf.Post("/", writeBlock)
    barf.Post("/new", newBook)


    // start barf server
    if err := barf.Beck(); err != nil {
        barf.Logger().Error(err.Error())
    }

}
And that is it! We just built an entire functional blockchain implementation following the standard blockchain procedures to force trust and integrity of transactions or sensitive objects.
To test that everything checks correctly, here's a test file to validate the functions and behaviour of our program:
package main

import (
    "net/http"
    "net/http/httptest"
    "strings"
    "testing"
)

func TestCreateBlock(t *testing.T) {
    prevBlock := &Block{
        Pos:       1,
        TimeStamp: "2022-01-01",
        Hash:      "prevHash",
    }

    data := BookCheckout{
        BookID:       "123",
        User:         "John Doe",
        CheckoutDate: "2022-01-02",
        IsGenesis:    false,
    }

    block := CreateBlock(prevBlock, data)

    // Add your assertions based on the expected behavior of CreateBlock
    if block.Pos != prevBlock.Pos+1 {
        t.Errorf("Expected Pos to be %d, got %d", prevBlock.Pos+1, block.Pos)
    }

}

func TestAddBlock(t *testing.T) {
    // Initialize a sample blockchain
    blockchain := NewBlockChain()

    // Create a sample book checkout data
    bookData := BookCheckout{
        BookID:       "456",
        User:         "Jane Doe",
        CheckoutDate: "2022-01-03",
        IsGenesis:    false,
    }

    // Add a block to the blockchain
    blockchain.AddBlock(bookData)

    // Add your assertions based on the expected behavior of AddBlock
    if len(blockchain.blocks) != 2 {
        t.Errorf("Expected blockchain length to be 2, got %d", len(blockchain.blocks))
    }

}

func TestHTTPHandlers(t *testing.T) {
    // Create a sample HTTP request for the newBook handler
    reqBody := `{"isbn": "123456789", "publish_date": "2022-01-01", "title": "Sample Book", "author": "John Doe"}`
    req, err := http.NewRequest("POST", "/new", strings.NewReader(reqBody))
    if err != nil {
        t.Fatal(err)
    }

    // Create a sample response recorder
    rr := httptest.NewRecorder()

    // Call the newBook handler
    newBook(rr, req)

    // Check the response status code
    if status := rr.Code; status != http.StatusOK {
        t.Errorf("Handler returned wrong status code: got %v want %v", status, http.StatusOK)
    }

}

func TestGenesisBlock(t *testing.T) {
    // Create a Genesis block
    genesisBlock := GenesisBlock()

    // Ensure that the Genesis block has the expected properties
    if genesisBlock.Pos != 0 {
        t.Errorf("Expected Genesis block Pos to be 1, got %d", genesisBlock.Pos)
    }

}

func TestHashGeneration(t *testing.T) {
    // Create a sample block
    block := &Block{
        Pos:       1,
        TimeStamp: "2022-01-01",
        PrevHash:  "prevHash",
        Data: BookCheckout{
            BookID:       "123",
            User:         "John Doe",
            CheckoutDate: "2022-01-02",
            IsGenesis:    false,
        },
    }

    // Generate the hash for the block
    block.generateHash()

    // Validate that the block's hash is not empty
    if block.Hash == "" {
        t.Error("Expected non-empty hash, got an empty string")
    }

}

func TestBlockchainStartsWithGenesisBlock(t *testing.T) {
    // Create a new blockchain
    blockchain := NewBlockChain()

    // Ensure that the blockchain starts with the Genesis block
    if len(blockchain.blocks) != 1 || blockchain.blocks[0].Pos != 0 {
        t.Error("Blockchain should start with the Genesis block")
    }

}
We have demonstrated how blockchain as a technology can be applied to a simple book-purchasing store. This project might not be deployable as an all-new blockchain that will change the world but with this, you now have a hands-on understanding of how the technology works under the hood!
Also, you should consider using barf for your next GO project! Especially if you're a MARVEL fan like its author!
You can find the full implementation on GitHub here: https://github.com/midedickson/go-blockchain
If you enjoyed this, kindly leave a like, and follow for more technical content like this. Till I write again, BYE! 👋